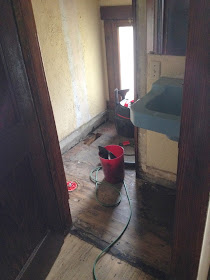
When we moved into our 1920 abode, the first floor bathroom left much to be desired. The tiny afterthought of a powder room is tucked underneath our second set of stairs (the "servants" stairs) between the kitchen and the living room. There were many issues with the bathroom. First of all, the red linoleum floor was partially torn up, and the entire floor reeked of cat urine because a litterbox had been in the room for so many years. Second, the toilet leaked into the floor, causing the floor to buckle and the toilet to lean to one side. Third, the stucco yellow paint was peeling and cracking everywhere, revealing years and years of paint color changes. And fourth, the sink was so close to the toilet that you could use both at the same time. Not only that, but you could barely fit between the sink and the door if the door was closed. Yikes!
The red linoleum is the same as our kitchen floor, and it continued on into the hallway and the bathroom.
Do you see the toilet paper hanging down from the ceiling? Classy small-space solution :)
I basically avoided using this bathroom for two years--it was just too small.
I basically avoided using this bathroom for two years--it was just too small.
To begin the renovation, Steve tore up the linoleum in the hallway and the bathroom. He sanded and stained the hardwood floor in the hallway to match the rest of the house.
The blue sink really only left about four inches for a person to fit between it and the closed door. It also leaked, thus the container on the floor to catch water.
Steve tore out the heating duct on the far wall (it traveled through the bathroom to heat the stairs). He cleaned up the floor, pulling all the nails and staples in preparation for hardiebacker (cement board). For the toilet, he installed a new PVC toilet ring (flush with the new floor) so the new seal wouldn't leak.
When we picked up our new corner sink at Lowe's, we were excited to see how much smaller it was than our blue sink!
Hardiebacker is installed. Planning the floor tile!
Because our local store doesn't typically stock all-white tile, we used the black-and-white and replaced the black tiles as we went.
Steve took down the two giant side-by-side mirrors, revealing gross globs of brown glue and ancient pink paint. The blue sink left big craters in the yellow stucco paint. Steve replastered the walls and ceiling until they were finally smooth. This took several days. Then, he painted the whole bathroom a bright shade of white to lighten up the space.
He cleaned all the old paint off of the wood trim, restained them, and reintalled them.
From there, he installed the new sink and faucet, and a new light fixture (all from Lowe's). Last week, we bought a mirror from Walmart for only $25. It's the "Better Homes and Gardens Vintage Luca Mirror".
Here is the final transformation!
We gained so much space with our tiny corner sink!
This is hard to get a good photo of, but it's the space behind the wall with the sink/mirror. Now that it's clean, painted, and tiled, we can use it for storage. (Or for the boys to play hide-and-go-seek.) :)
We are so happy with how it turned out! It was a project that took many months, and it was worth waiting for. :)
Have you redone a small bathroom like this before? I'd love to hear.


Holy smokes, awesome work!!!
ReplyDeleteShoes to Shiraz
So nice!! What a fantastic transformation.
ReplyDeleteThis reminds me of a tiny bathroom in our hotel rooms in London on one of our trips. Ben's mom said that you really could "sh__", shower and shave without moving your feet. Only yours is much cuter!
ReplyDeleteYou did a great job!!! We really need to do this with our basement bathroom!
ReplyDeleteWow, this looks amazing! Great job!
ReplyDeleteWhat a great job!
ReplyDelete